Canvas Uniformity & Browser Fingerprint Spoofing
(Chrome Extension)
💡 Manually Control your Browser Fingerprint:
Enhance your Browser Privacy, and Create Stealthy Virtual
Machines with advanced canvas control, and system-level
transparency. Obscura helps reduce data leaks by allowing you to
deliberately align your environment with standard browser
characteristics—no tracking, no randomness, just consistency.


🔍 Summary:
Obscura: Canvas Uniformity is a Chrome Extension and browser
fingerprint hardening tool focused on deterministic fingerprint
spoofing, not randomization. Unlike most canvas privacy tools—which rely
on canvas poisoning (randomizing values per session or per site)—Obscura
enforces a uniform and stable fingerprint across sessions, devices, and
domains. In other words, unlike most anti-fingerprinting tools that aim
for evasion through noise. Obscura aims for camouflage through
control.
Canvas Poisoning (e.g., Brave Browser, Tor Browser)
works by introducing entropy into the fingerprint surface. This is
valuable for pure privacy because it prevents tracking across
sessions.
Canvas Uniformity, works by spoofing canvas output
with fixed, user-defined values, ensuring your fingerprint looks
consistent and deliberate, but never real.
🛡️ You can appear as a stable identity, not a chaotic or rotating
one
🎯 Ideal for Red Team simulations, bot development, penetration
testing, or controlled fingerprint spoofing
👤 Still useful for privacy, especially if you want to impersonate a
common browser profile rather than stand out as “random”
⚙️ How Obscura Works:
Obscura injects JavaScript into every page context, using browser
APIs like getImageData(), toDataURL(), and getContext() to override and
spoof the outputs of HTML canvas rendering. Your configuration (set via
config.html) determines how canvas fingerprinting attempts are handled.
Injected values are deterministic (defined by you). Obscura ensures the
spoof is applied before page scripts execute.

CSP-bypass.js (Chrome Security Policy) enables inject.js to
successfully inject on 95% of websites. While
chromelaunch2.bat blocks WebRTC so your real PC specs, and IP don't
leak.
📛 Masks canvas getImageData() and toDataURL() output
⚙️ Offers full control through a local config panel
🧱 Optional CSP bypass for locked-down environments
🧪 Designed for privacy lab testing, pen testing, and educational
use
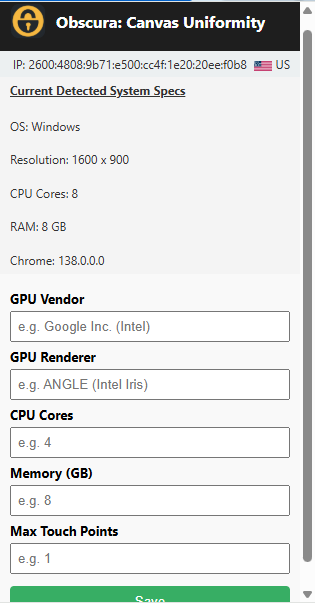
⇒ Obscura automatically detects your current IP, OS,
Resolution, CPU Cores, RAM, and Chrome Version for your convenience, and
safety!
🚀 Installation
To install Obscura in Chrome or any Chromium-based browser:
Step 1: Download the repository ZIP file here: https://github.com/Nathaniel-Coulter/Obscura-Canvas-Uniformity/raw/main/Obscura-Chrome.zip
(Then click the on the arrow and select “Download ZIP” , if isn't
downloaded automatically.)
Step 2: Extract the ZIP Unzip the contents into a
folder on your desktop or another easy-to-access location. (Left Click
-> Extract)
Step 3: Open Chrome and navigate to chrome://extensions/ or Click
the little Puzzle Piece to the right of your address bar, than click
manage extensions. (You can also click the menu icon → Extensions.)
Enable Developer Mode Toggle the Developer mode switch in the
top right corner of the extensions page. Then click “Load
Unpacked” and select the folder where you extracted Obscura.zip.
✅ Obscura should now appear in your extensions list and begin
functioning automatically.
To Download Via PowerShell, CMD, MacOS or Linux
Terminal:
wget https://github.com/Nathaniel-Coulter/Obscura-Canvas-Uniformity/raw/main/Obscura-Chrome.zip

                        curl -LO https://github.com/Nathaniel-Coulter/Obscura-Canvas-Uniformity/raw/main/Obscura-Chrome.zip

                        Invoke-WebRequest -Uri "https://github.com/Nathaniel-Coulter/Obscura-Canvas-Uniformity/raw/main/Obscura-Chrome.zip" -OutFile "Obscura-Chrome.zip"

                        powershell -Command "Invoke-WebRequest -Uri 'https://github.com/Nathaniel-Coulter/Obscura-Canvas-Uniformity/raw/main/Obscura-Chrome.zip' -OutFile 'Obscura-Chrome.zip'"
Note: No dependencies are required to start spoofing. To customize
behavior, use the built-in config panel (see next section).
⚙️ Running & Configuration
To get the full benefits, it’s important to launch Chrome in
a way that supports spoofed User-Agent, window size, and network stack
behavior.
🧭 Launch Chrome with Spoof Flags
Included in this repo is a Windows batch script named:
chromelaunch2.bat. This launches Chrome with a custom
User-Agent string and other privacy flags. These flags help simulate a
full browser fingerprint and suppress real system data that might
override your spoofed inputs.
📦 Launch Script Contents:
@echo off
                        REM === Launch Chrome with spoofed fingerprint parameters ===
                        start chrome.exe ^
                          --user-agent="Mozilla/5.0 (Windows NT 10.0; Win64; x64) AppleWebKit/537.36 (KHTML, like Gecko) Chrome/138.0.7204.98 Safari/537.36" ^
                          --lang="en-US,en;q=0.9" ^
                          --window-size=1440,900 ^
                          --disable-webrtc ^
                          --disable-accelerated-2d-canvas ^
                          --disable-background-networking ^
                          --disable-background-timer-throttling ^
                          --disable-client-side-phishing-detection ^
                          --disable-hang-monitor ^
                          --disable-popup-blocking ^
                          --disable-default-apps ^
                          --no-default-browser-check ^
                          --no-first-run
🐧 Linux/macOS Users: 🍎
Use applelaunch.sh & linuxlaunch.sh instead of
chromelaunch2.bat to run Chrome.
linuxlaunch.sh for Linux
If your system uses chromium instead of google-chrome,
replace the first line
#!/bin/bash

                        # === Launch Chrome or Chromium with spoofed fingerprint parameters ===
                        google-chrome \
                          --user-agent="Mozilla/5.0 (Windows NT 10.0; Win64; x64) AppleWebKit/537.36 (KHTML, like Gecko) Chrome/138.0.7204.98 Safari/537.36" \
                          --lang="en-US,en;q=0.9" \
                          --window-size=1440,900 \
                          --disable-webrtc \
                          --disable-accelerated-2d-canvas \
                          --disable-background-networking \
                          --disable-background-timer-throttling \
                          --disable-client-side-phishing-detection \
                          --disable-hang-monitor \
                          --disable-popup-blocking \
                          --disable-default-apps \
                          --no-default-browser-check \
                          --no-first-run
Launch Script:
./linuxlaunch.sh
applelaunch.sh for macOS
Make sure the path to Chrome is correct (I used the default for
macOS).
#!/bin/bash

                        # === Launch Chrome with spoofed fingerprint parameters ===
                        "/Applications/Google Chrome.app/Contents/MacOS/Google Chrome" \
                          --user-agent="Mozilla/5.0 (Windows NT 10.0; Win64; x64) AppleWebKit/537.36 (KHTML, like Gecko) Chrome/138.0.7204.98 Safari/537.36" \
                          --lang="en-US,en;q=0.9" \
                          --window-size=1440,900 \
                          --disable-webrtc \
                          --disable-accelerated-2d-canvas \
                          --disable-background-networking \
                          --disable-background-timer-throttling \
                          --disable-client-side-phishing-detection \
                          --disable-hang-monitor \
                          --disable-popup-blocking \
                          --disable-default-apps \
                          --no-default-browser-check \
                          --no-first-run
Launch Script:
./applelaunch.sh
🔨 Configuration
🧠 (IMPORTANT) While the built in scripts will
detect some specs, that feature is mostly for your convenience and not
to validate your setup.
This extension mainly aims to spoof 8 values:
-User Agent
-Language
-Window Size/Resolution (Height and Width)
-GPU Vendor (aka WebGL Vendor)
-GPU Renderer (aka WebGL Renderer)
-CPU Cores
-Memory (GB)
-Max Touch Points
(The Bat file handles the first three, and the extension itself
handles the remaining five. See Config Recomendations.txt for copy paste
examples for the extension.)
⚠️ Batch File: ⚠️
I personally recommend using the most recent version of Chrome for
your OS, which are the following as of July 8, 2025...
138.0.7204.98 for Windows
138.0.7204.94 for macOS
138.0.7204.100 for Linux
However, if your goal is to blend in;
1.) Visit https://amiunique.org
2.) Click “See my fingerprint”
3.) Scroll down → Click “Global Statistics”
4.) Choose a recent timeframe (last 15–30 days)
5.) Under “Web Browser” click the hamburger menu (☰) → View Data
Table
6.) Copy User-Agent, GPU, and other popular specs from high-traffic
entries
💯 This gives you realistic input values to copy into Obscura’s
configuration panel as it will show you which (Chrome) Version the
majority of site visitors were using during the given timeframe.
🥷Stealthy Virtual Machines
** The following inputs are EXTREMELY important if your browser
exists on a Virtual Machine or Qube like mine.** As the typical Virtio
& Swift graphics drivers, paired with low CPU and Memory specs are
the tell tale signs of a Virtual Machine!
👉 GPU Vendor: Google Inc.
(Intel)
I suggest using "Google Inc. (Google)". Make sure your GPU Vendor and
and Renderer are typed correctly so they match other users.
👉 GPU Renderer: ANGLE (Intel, Intel(R)
Iris(R) Xe Graphics (0x00009A49) Direct3D11 vs_5_0 ps_5_0,
D3D11)
If you aren't running Obscura on a Virtual Machine and your
similarity ratio on amiunique is high, meaning you don't have a unique
GPU Renderer, than you can consider leaving this field blank. If you
want to impersonate another machine, visit chrome://gpu
for exact Specs to copy. Or Google the specific specs of another
machine.
👉 CPU Cores: 8
👉 Memory (GB): 16
If you are using Obscura on your native OS, and/or have normal
hardware specs, i.e, 8 Cores, 16GB of Ram -- then you're probably
okay.
NOTE: By "Cores" to allocate, I mean vCPUs. Websites can't
see what hardware you're running, as they are blocked from running
commands on your terminal. This means they can only estimate your
hardware based on your drivers, and other leaks we addressed via the
batch file... So even if you have an older i5 chip or equivalent with
6-10 physical cores, it should support dual threads so 6*2=12 VCPU's. If
you can get by without using the extension by allocating more vCPU
"cores" to your VM, that is always the best option.
However, if you're running a VM without the ability to allocate a
minimum of 4 Cores and 8GB, definitely use the inputs below. (I still
HIGHLY recommend getting an SSD / Qubes so you have the ability to
allocate normal looking resources to your VM for Redteam sims or just
everyday use without getting flagged by Banking sites). Your system's
memory isn't the biggest concern but know that some sites can see how
much remaining space you have on your drive. Most are not that
agressive, and have no need to be that invasive however.
Suggestion: Only deviate from suggested specs unless you're aiming to
spoof a certain machine, otherwise your browser fingerprint will be too
unique if you put like 7 cores and 15GB of RAM it isn't realistic
anymore.
👉 Max Touch Points:
-Set as 0 or leave blank for most Standard Desktops.
-Set as 1 for Touch Screen Laptops.
-Set as 5+ for Mobile Device Spoofing (Advanced).
👉 Spoof Audio & Fonts Optional — Disables
AudioContext fingerprinting (set to false by default along with fonts
since version 4.1 as they began to get flagged and I found it easier to
just use the Bat for fonts, or download them -- and leaving audio
unspoofed since any similarity ratio that isn't 0.00 will do). I did
leave the code though in case you can't use Batch files, and you don't
have a windows license. For those fringe cases you can tweak config.html
and popup.js to readd the ability to toggle spoofs on.
Example Configuration: Base i5 Lenovo ThinkPad (2020)
{
                          "userAgent": "Mozilla/5.0 (Windows NT 10.0; Win64; x64) AppleWebKit/537.36 (KHTML, like Gecko) Chrome/138.0.7204.98 Safari/537.36",
                          "gpuVendor": "Google Inc.",
                          "gpuRenderer": "ANGLE (Intel, Intel(R) UHD Graphics 620 Direct3D11 vs_5_0 ps_5_0)",
                          "hardwareConcurrency": 4,
                          "deviceMemory": 8,
                          "maxTouchPoints": 1,
                          "spoofAudio": false
                        }
❗❗❗Final Config Tips:❗❗❗
1.) If your VM can’t allocate at least 4 CPU cores and 8GB RAM, use
those values anyway in Obscura — but understand that some
fingerprinting tools may still detect hardware inconsistencies between
your browser (which is spoofed), and what they can estimate from your
base OS.❗❗❗
2.) GPU Renderer: If your similarity ratio is high (i.e., many people
have your renderer), you may choose to leave it blank to simulate
ambiguity. (See start of next section)
3.) Copy and Paste; Obscura will inject exactly what you tell it to.
Make sure there's no typo's.
🧪
Testing, Fingerprint Hygiene & Advanced Spoofing
‼️AmIunique.org isn't perfect
The data you're being compared against is everyone who's visited the
site in the given timeframe you're viewing. For that reason, note that
just because a similarity score for your user agent (Chrome Version) is
lower than another version, that doesn't neccesarily make it less
legitimate. If you're using the latest stable release, you have to
account for the lag in user adoption. So try changing the time period to
today / this week.
On the otherhand, if you have a high similarity score for
WebGL Vendor or WebGL Renderer. But you're on a Virtual Machine...
That's actually a bad thing. You aren't blending into the
target segment of internet users -- Don't misinterpret the data,
you're blending in with bots so you should still inject a
driver that doesn't reflect the usage of a VM or headless browser.
Once you’ve installed and configured Obscura, it’s important to
validate your fingerprint, check for leaks, and ensure your setup is
trusted. Here’s a comprehensive guide to do exactly that.
✅ Validate Your Fingerprint Use the following
tools:
🔎 AmIUnique.org — Check canvas spoofing & compare similarity
ratios
🖼️ BrowserLeaks.com (Canvas Test) — Detect canvas tampering
🚰 Dnsleaktest.com — Additional resource for WebRTC and DNS (Domain
Name System) validation
🔬 Pixelscan.net — Advanced fingerprint scanner with tracker
detection (Pass or Fail test detects headless browser or webscraping bot
similarity).
📡 Whoer.net — Displays IP, proxy/vpn status, DNS, and WebRTC leak
status
🔐 Fingerprint Hygiene Checklist
🛡️ Use Obscura with realistic fingerprint values (canvas, GPU, UA,
memory, etc.)
🧱 Block WebRTC to prevent real IP leakage (handled in
chromelaunch2.bat)
🧭 Use a trustworthy residential proxy, not a VPN — VPNs are
fingerprinted easily. (You could use a sys-VPN routed Appvm on
Qubes and use Proxifier to connect to the Socks5 on your Windows iso.
See Qubes section for more).
📛 Avoid DNS leaks by routing all DNS traffic through your proxy or
system-level firewall
🔁 Keep your spoofed values consistent across sessions to avoid
standing out
🏠 Use Residential Proxies — Not VPNs Why not a VPN? VPN IPs are
often flagged, associated with datacenters, and shared by thousands of
users. This raises red flags for anti-fraud systems and breaks your
OPSEC model.
Recommended Networking Approach: Use a residential
or mobile proxy (e.g., SmartProxy (Decodo), IPRoyal, Oxylabs) that
provides: Sticky sessions, Custom IP rotation, ISP-level
trustworthiness
(Check IP trustworthiness with sites https://getipintel.net/ or https://www.maxmind.com/en/request-service-trial?service_minfraud=1)
These give you the cleanest spoofed profile when paired with
Obscura.
🕵️Qubes OS (& Bonus
OPSEC Rant)
VPN's don't do anything to protect against DNS / WebRTC
leaks. I wouldn't even use one with Tor unless it was to hide
my activity from an ISP (Internet Service Provider). Even then you could
just use a Tor Bridge.
Browsers will leak both even if you manually disable them in
a given browsers settings. Yes, even Brave and especially
chrome. Firefox is safer to an extent. But your DNS + WebRTC can still
leak your real IP. All you're doing is hiding traffic from your
ISP.(Tails won't save you either even with JS disabled -- I still love
Tails for Electrum & Cold Wallets though❤️). My personal
recommendation for anyone who wants to be as OPSEC conscious as possible
is to use Qubes OS on an SSD you can connect via lightning port. https://www.qubes-os.org/
Here's a breif overview of my Qubes OS setup:
1️⃣ Main qube: Windows10 iso
(extremely hardened with extensions like Obscura, additional WebRtc +
DNS blocking apps, fucktelemetry.cmd (https://gist.github.com/FadeMind/9500d49948654b50aa870706a8ac9f04),
manually disabled IPv6 in Network & Ethernet settings so I can only
allow IPv4 traffic out, and Proxifier.)
Proxifier allows you to route all traffic through a
dedicated Proxy, and does a really good job ensuring no leaks if you
configure rules correctly.
^I don't have that qube connected to my home wifi. All networking is
routed through another StandaloneVM (Qube) ->
2️⃣ Proxy Qube (Sys-proxy): I previously built a
Void-Linux template, although I now use
Gentoo-Minimal (community template) because of missing
dependencies and Qubes compatibility trouble. This qube uses tun2socks,
redsocks, and IP Tables to catch as much traffic as possible leaving
win10 and route it all through a socks5 provider. Redsocks &
iptables configured to block anything else from leaving if it's not
routed through the Socks5. This is a step up from just using Proxifier
inside your windows qube, but its well worth it if you have the time and
willingness to setup. You know exactly what comes in and out of your
Qube.
All networking routed through ->
3️⃣ Firewall VM: I chose Alpine
Linux for this Appvm (iso not template) because it's super
lightweight, minimal attack surface, and you can control everything that
comes in or out since you pretty much have to allow, and build all
networking compatibilities / dependency packages with qubes in 2025.
This Qube serves as a final attempt to stop anything from leaving the
chain. Basically, copies and builds upon the firewall in proxy VM just
stricter, and serves a few other purposes like MAC Address
spoofing.
MAC Address Spoofing isn't usually needed in Qubes
because only your net-vm "touches" physical hardware like your router or
modem. The reason I have Firewall VM coded to spoof it on start, is
because I use Qubes from networks other than my home wifi occassionally.
Hotels, Office, School... Even though your AppVM's have their MAC
addresses abstracted as a result of compartmentalization, and their
networking being routed from net-vm downstream... it's still feasible
that your net-vm could get tracked. (That's partially why I have the
next VM where it is in the chains order. To serve as a "bottom up
buffer" against Kali users & wifi networks I'm not in control of).
💀
All networking routed through ->
4️⃣ VPN VM (Sys-Mullvad): Debian minimal
template, very basic setup. I use Mullvad VPN, but this is more
to obscure ISP traffic, and make it so no traffic from my windows
machine ever touches my actual wifi. I usually keep the same IP address
for a few days, and i'll hardcode IPtables + redsocks firewalls to only
allow traffic leaks from that IP. But I don't always have it chained
when i'm home or doing normal browsing on a personal-vm. Since I boot
qubes from an SSD, it's nice having a dedicated VPN qube to be used on
public networks, as a good first machine for the network to connect to.
Also, I use Mullvad as a VPN and VPS provider because I trust them with
my data. The Swedish police raided them a few years ago, and left with
nothing because Mullvad themselves doesn't keep logs. 😂😆🤣 Not to
mention they are priced amazingly, and quite easy to setup using
WireGuard on a bare Standalone VM like Debian Minimal.
5️⃣ Sys-net: This is just a normal network VM like
how you'd connect to the internet on a normal operating system. Template
= (Fedora-41).
In sum — your first machine doesn't have to be a Windows10 machine. I
also have a few other ISO's that I connect to this chain depending on
use cases; like Parrot, BlackArch or Kali (if you're a 15yr old
MentalOutlaw viewer).
📁 File Overview
‣background.js - Core extension script handling
background injection and runtime behavior.
‣inject.js - Injected into web pages to override
canvas fingerprinting APIs.
‣popup.js - Handles popup logic
‣config.html - Configuration panel for customizing
spoof values manifest.json Chrome extension manifest (v3) declaring
permissions and scripts.
‣CSP-bypass.js - Additional script to inject
spoofing code even on CSP-protected sites.
‣chromelaunch2.bat - Batch script for launching
Chrome with spoofed fingerprint flags.
‣Config Recommendations.txt - Original notes for
tuning spoof values — content integrated into README.
icon16.png, icon32.png, icon48.png, icon128.png are just icons used
by the extension in different browser views logo.png, mdheader.png
Branding assets used in README and UI Readme.Rmd RMarkdown source file
for generating the README Readme.md Final GitHub-rendered README
document.
This project is licensed under the MIT License — see the LICENSE file for full terms.